So well, let's build an LPT DAC! What is this first, what it can give? In short this was the "poor man's sound card" in the early 90's, a simple solution giving you a decent 8bit mono digital output if carefully assembled from the proper parts. Of course it won't be a Sound Blaster, only a few games, MOD players and trackers support it, but if you have these, it can be a nice add-on especially for those old brick notebooks not having any advanced sound support.
Software support
First of all, what software support will you get once you build one? This list is not complete, just gives some notable examples:
- Galaxy Music Player (1.2), downloadable from SAC. From all MOD players I tried this has the thinnest requirements, it can play 4 channel mods at 36KHz fine on my 20MHz 3.86 powered Chicony notebook.
- Impulse Tracker, official site. Well, if you not only want to listen, but to edit MODs as well. This has a bit steeper requirements.
- Pinball Fantasies, a very good pinball game. You may find it on practically any abandonware site.
- Virtual Sound Blaster (Andrew Zabolotny), downloadable with source. This software (binaries are in /sbemu/ready) will emulate the digital output of a Sound Blaster card on an LPT DAC. It might actually work.
Note that some old software may refer to an LPT DAC by the name Covox or Covox Speech Thing (This thing was manufactured and sold under this name back then) or Disney Sound Source (This was something a bit more complex than a plain DAC, but the plain DAC should work too with these).
So what do you need? - Part list
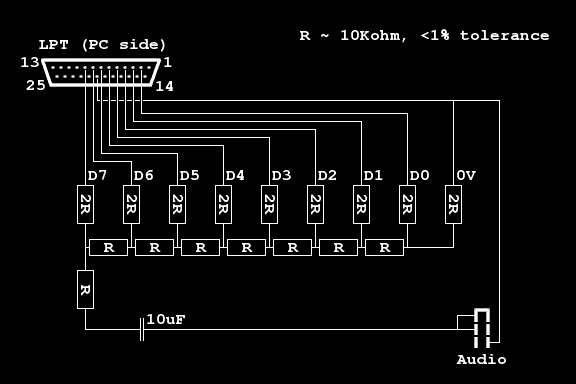
The LPT DAC is actually a very simple peripheral, all the components it will need will probably cost less than an euro. You should however pay attention to a few things to get a decent sound quality. The circuit diagram is down here, so first, let's get down to business, then the explanations:
- At least 30 1% tolerance or better resistors between 8KOhms and 16KOhms (All the same).
- An at about 10-20uF electrolyte capacitor.
- A 25pin male D connector.
- A female audio connector.
- Some box or anything to hold that bunch of stuff once you solder it together.
- Soldering equipment.
- Some multimeter or anything to measure the resistors (Optional).
Note that the resistance values are actually not much important. Just take what the vendor has somewhere in this range at 1% or better accuracy. Don't go below since then the probable internal resistances of the LPT port's pins will deteriorate output quality, while going way higher will bring in the effect of the non-infinite resistance of a connected speaker amplifier (Note: Only using resistances below at about 1KOhms would become probably harmful to the LPT port's circuits).
Assembly
So why use equivalent resistors and why measure them?
Usually when you acquire a set of resistors they typically come on a sheet, so were manufactured in one run (If possible, try to ask the vendor to give you them on one continuous sheet to be sure). These resistors are typically very close to each other in resistance, so you may actually get significantly better results than what the tolerances suspect. This answers the question on why to create the 2R resistances from two R resistances: This way your 2R's will be really the duplicate of R's. The role of measuring the resistors is to tune it a little further: The actual accuracy of the multimeter does not even matter much, if it can produce a stable result, it is fine for the purpose. Remember, you only have to get the resistances correct relative to each other, not against some set value. First you separate the best of your resistors for the DAC, then make pairs for 2R's from the low end and high end resistance values: this ensures you used your resources the best for the best possible sound quality.That little 10uF capacitor acts as a high-pass filter: It's only role is to remove DC offset in case the DAC was left in some nonzero state for long. By the circuit above it's actual cutoff frequency is indeterminable (It would need a load resistance), if you connect an amplifier with an internal resistance in the range of 100KOhms it would cut off at approx 1/6Hz. If you want by adding a large load resistor (100KOhms or so) you may tune the cutoff, or might add a low pass filter too to clean off some digital noise. I don't think it would worth though (The added load will deteriorate the quality of the ladder DAC).
The resistance sitting just before the capacitor does not contribute much to the output quality (It truly has no effect at all), however it is important as being in series with the audio jack it protects your LPT port from anything shorting the jack (Most importantly when you plug your speakers in). It also protects your stuff in case one tried to hook up a passive speaker to it (Passive speakers has an impedance in the range of a few ohms, so in practice they are short-circuit for this purpose. You won't get any sound from those of course).
Well, this is probably all what can be said on the project.
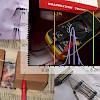
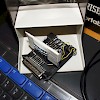
Carefully solder these stuff together as the circuit diagram tells, then to be sure, probably measure the resistances again (Some bad soldering might add some unwanted resistance). If you did it right, you might get a nice 6-8bit output depending on your resistors and how the thing was assembled. Finally put this all in some container, maybe a little better than mine here :) - well, it works, then who cares?Verifying
So how to verify that the bunch of stuff you soldered together does it's job? It is actually quite simple. You will just need the cheap multimeter probably used before for measuring the resistances. Put it in voltmeter mode, and connect one of it's terminals to ground (Some wire coming from pin 20 of the LPT port, ending in the audio jack ground), the other just before the filtering capacitor (As the capacitor would filter out DC what you will want to measure here).
Then probably that old piece of computer you wanted to use it with has Quick Basic somewhere, at least if it still runs MS DOS, it should have. Create some code among the lines of this:
' LPT - DAC tester

i = 0
j = 0

WHILE INKEY$ <> "x"

 OUT &H378, i
 j = j + 1
 IF j = 1000 THEN
  j = 0
  i = i + 1
  IF i = 256 THEN i = 0
 END IF

WEND
Adjust the speed (by the IF j=1000 statement) to your needs: you should set some rate so each step will output for at least at about 2-3 seconds so your voltmeter may stabilize on it. Run the program, and look at the meter's display. It should show slowly increasing voltage until at about 4,5 or so volts, then starting over from zero. Check how smooth is this incrementing: If all values nicely follow each other in an incremental pattern, you got a true 8 bit DAC (Mine does so, so it is possible if you take care when doing the job). You may also attempt to check linearity too once you are here, but that shouldn't be a problem with resistors in this range.
Ladder DAC theory
Just to read if you are interested.
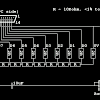
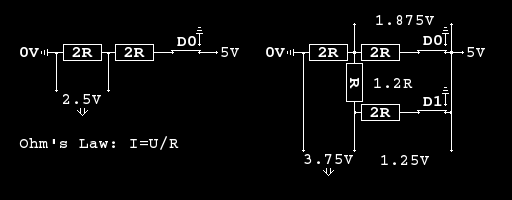
The ladder DAC is actually a quite simple thing to understand if you put some effort in it. So how it provides you the analog signal from the digital inputs? It simply boils down to the most fundamental law of electronics: The Ohm's law, you know, the relation of current, voltage and resistance: current (I) = voltage (U) / resistance (R). You can use this law on any (well, mostly DC as with AC things start to show much more peculiar behaviors) circuit as long as they are unfold-able to simple serial or parallel constructs. The ladder DAC, at least without considering the load on it's output, is such a circuit. See the image below.
This small image shows the case of a theoretical 1 bit and a 2 bit DAC with all data pins set. A ladder DAC's highest voltage output is so one "step" lower than it's digital source's voltage. If all data pins are disconnected, obviously the output will go down to ground (0 volts). In the 2 bit DAC example you might try switching only D0 or D1 to ground, you will see that in the first case you get 2,5 volts, the second, 1,25 volts. D1 is so the more significant output pin.
With this you may well see that adding more steps to the ladder will behave similarly, each step doubling the set of possible output voltages. So that's how it works.
Some final words
After several years my little pile of resistors still functions properly, well, what can go wrong with such a simple thing? It is an easy and I think rewarding project for anyone who likes these retro stuff and wants to take a peek in electronics. Just do it if you like, nothing can go wrong if you are careful (Maybe if you are afraid of it, try the DAC on some less valuable PC than your loved vintage laptop to avoid damaging it's LPT port by some accidental short in your circuit).
Bad circuits around
Note that there are several sites showing various forms of the DAC including this plain form and externally powered ones with an integrated amplifier. I observed that on many sites the simple DAC (Without an amp) is incorrectly shown with an 'R' valued resistor across the sampling points (The terminals of the audio connector). This won't work. If you soldered one together that way, just rip that 'R' out from there, it will likely produce some more meaningful sound then :)
Make a comment
Rules
- Please be polite (Leave all your trolls in their respective caves).
- If #1 fails, don't feed 'em. They bite.
- No links allowed. It won't pass. Neither chains. Use '(dot)' notation.
- Spam reeks.
- Text is (some day will be) formatted with Markdown.
- Your mail address is only visible to me: I understand you also don't like #4.
- The mail address you provide is also used to fetch your Gravatar.
- Danger! High voltage! Right between your "Post Comment" button and ground.
- Still want to comment? Go ahead! :)
Comments
Jubatian
Jim_T: Sorry for late reply, Positive on the left, Negative on the right for that one!
Jim_T.
This project is awesome, excellent work and thanks for sharing this. I am trying to an 486 laptop that has no audio card. Which is the right side for electrolyte capacitor?
Jubatian
Thanks, it was a fun little project for me. If interested in retro style stuff, you may also take a look in my more recent posts, particularly Flight of a Dragon, some 8 bits and electronics weirdness :)
I checked out your site, interesting, but I doubt people loving retro would want to do anything with online casinos :p (If you even get any revenue from that ad galore, couldn't you rather focus on something related? Like electronics, things for microcontroller projects, Arduinos or maybe Raspberry PI)
Trixter
This is one of the most helpful and useful articles I've seen on the subject, especially the theory behind building the 2R out of a known good batch of R, and also how to do a quick test using a short QBASIC program. Fantastic work!