In this article I am going to cover how it is possible and probably the most efficient to work with images using non-square pixels in Gimp. Why this has some importance? It is mainly useful for doing artwork for retro computing such as the quasi-standard 320x200 256 color VGA mode, the Commodore 64 and several other machines and display modes of the 80s which frequently had non-square pixels.
Introduction
What is the fuss about non-square pixels by the way? The problem is that the pixel aspect ratio determines the apparent aspect ratio of the image, causing quite annoying distortion when an image is viewed with a different setting than it was supposed to be rendered by. The most notable example which probably everyone should recognize or recall is the transition from 4:3 to widescreen in television: if a widescreen program was viewed on an old TV set with improper scaling, people might have suddenly appear thin and tall, while if the opposite happened, such as an old VHS recording displayed on the fancy new widescreen LCD, everyone might have became comically fat.
The same can happen if getting some interest in old-school machines and their displays you jump in doing some artwork without much consideration. Modern displays have an 1:1 pixel aspect ratio (perfect square), while those old machines typically had something different. It is not even that simple like the Commodore 64's Multicolor mode being 2:1 (pixels twice as wide than tall).
So you hopefully got it: you need to consider the true pixel aspect ratio of the system you target to get your art display on the original hardware like you intend it to look like. To have circles which are actually circles on the old TV set or whatever the computer used for display. The problem is that it is not necessarily trivial to solve this, so you can edit such images. Below a suitable solution is described for those using Gimp (using version 2.8, but others should be similar), covering the potential pitfalls and best practices along the way.
Fast and dirty setup
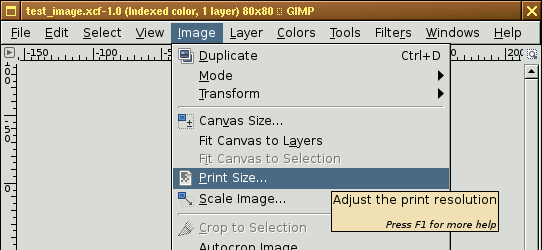
First a brief explanation. Gimp is capable to display images at their physical size if it knows the monitor's DPI (usually the monitor reports this proper). To get arbitrary pixel aspect ratio, this feature can be utilized as it can work with different horizontal and vertical resolutions. So how to set this up? First check whether Gimp detected your monitor's setting proper in Properties (can be found in the Edit menu).
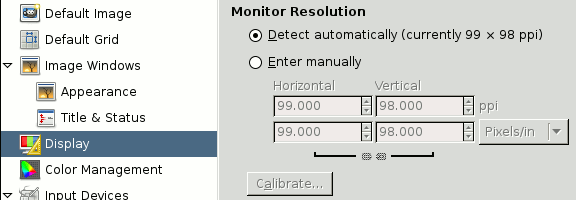
Note how it was auto-detected. You can override it if you need that, I will come back to this later, for now just remember these settings.
Then let's move on to the image settings (which are saved along with the image when you use Gimp's native xcf format). First you should turn off the dot for dot setting, found in the View menu.
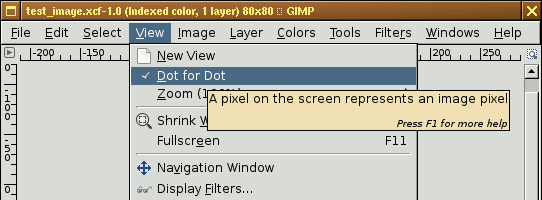
This setting when enabled asks Gimp to ignore the DPI of the image, and instead map it directly to display pixels at 100% zoom. Of course this is usually desirable, but it also hinders using non-square pixel aspect ratios, so it must be off. You might notice that the image's size changed, and even that it might have became more or less blurry.
Finally, you need to set up the image's DPI, which now determines its apparent size and pixel aspect ratio, using the Print Size menu in Image.
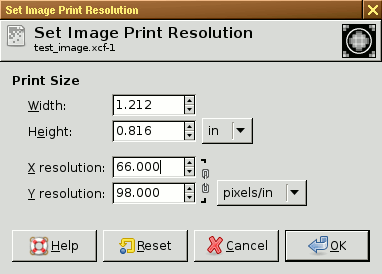
The example above sets up an 1,5:1 pixel aspect ratio on the 99:98 DPI monitor further above. Note that when opening the dialog, since the cursor is initially in the Width field, the X resolution might update to some fractional number. This is not desirable, and you should so correct it. Why so will be described in the next chapter.
Anyway, these are the basics. You can set up any aspect ratio by these settings, and then can edit it normally like any image, Gimp "magically" constraining you to the chosen pixel aspect ratio proper.
Let's make things a bit less blurry
When fiddling with the above, you might have noticed how the image became blurry. If you scale it up, however this blurriness disappears, although then you might encounter uneven pixel sizes (some pixels appearing to be fatter than others). Here the cause of this will be explained, and that how it can be minimized.
First, what happens there? Obviously some scaling has to go on to get the proper apparent size. Gimp does this by linear interpolation until you size the image about 2 times larger than it would look by the dot for dot setting (this is the blurry result), above that, it uses nearest interpolation (this is how you may get crisp but uneven pixel sizes).
You can only get around this problem by choosing your multipliers or dividers wisely when making up the desired pixel aspect ratio.
For some cleaner explanation on why this is necessary and how it works, let's use a test image:
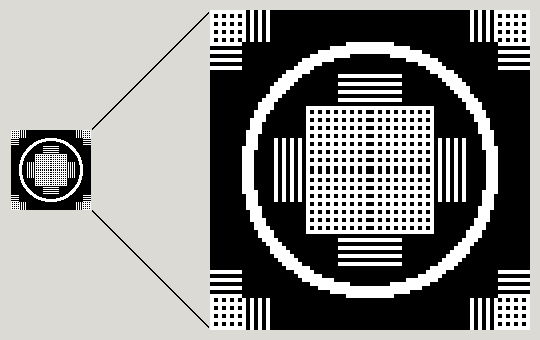
This is a little 80x80 image built to reveal the most important artifacts which may occur in the process. The purpose of the circle should be obvious: to get a visual feedback on the aspect ratio (how oval the circle becomes directly relate to the aspect ratio). The patterns within are alternating black and white stripes both horizontally and vertically, they are to reveal scaling artifacts.
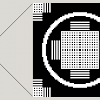
Now let's see what happens when one sets up an 1,5:1 pixel aspect ratio with properly chosen factors versus improper factors:
I purposely chose 99 DPI for the height on the left half to emphasize an usually less striking problem. Note how the height became one pixel shorter, and the mid portion all a blurred mess: the cause is that there Gimp attempts to scale 80 pixels (the height of the test image) into 79.
You would get similar results if for example the monitor's horizontal DPI wasn't a multiple of 3 and you wanted to get 1,5:1 aspect ratio by dividing that by 1,5 (which makes the apparent image 1,5 times wider).
The important detail so is to choose dividers or multipliers which remap the fewest source pixels to the fewest destination pixels without fractions. For 1,5:1 this means mapping a 2x1 pixel source (image) area onto a 3x1 destination (display) pixels area. For 5:6 (VGA 320x200), the best is to map 6x1 source onto 5x1 destination. The idea is to get fractions with the smallest numerator and denominators which adequately represent the chosen aspect ratio, a little bit of cheating may be more acceptable than having annoying distortions all the while when editing the image.
Also note that Gimp can only scale an image to whole pixel dimensions, so if you use for example 5:6 by dividing the horizontal DPI with 5/6, you will need to have an image width being a multiple of five to get the cleanest result.
If things doesn't want to cooperate, you can always change the monitor DPI, which may be desirable if you more often want to pixel than print stuff with exact size accuracy. Choosing the nearest multiple of 60 may be a very good choice, for example 120 DPI, so you can get most aspect ratios cleanly.
It is good to remember Shannon's law on sampling too: don't expect to see all details at 100% zoom if you end up shrinking a dimension of the image. Usually this shouldn't really be a concern since old systems had low resolutions, so you may rather double or even triple the apparent size of the pixel art you are working on to have it conveniently filling the screen.
Additional tips
The Grid setting of Gimp is also quite useful for editing images for old machines, usually constrained to tiles, those tiles having special limitations (such as attribute mode or Commodore 64's Multicolor mode). Set up the grid to 8x8 pixels (or 4x8 pixels if you do Multicolor pixel art), it might also be nice to alter its colors to your preferences. Note that Gimp doesn't scale the thickness of the grid's lines along with the image, so it works perfectly even if you chose to double or triple the apparent image size by its DPI setting.
Pixel aspect ratio chart
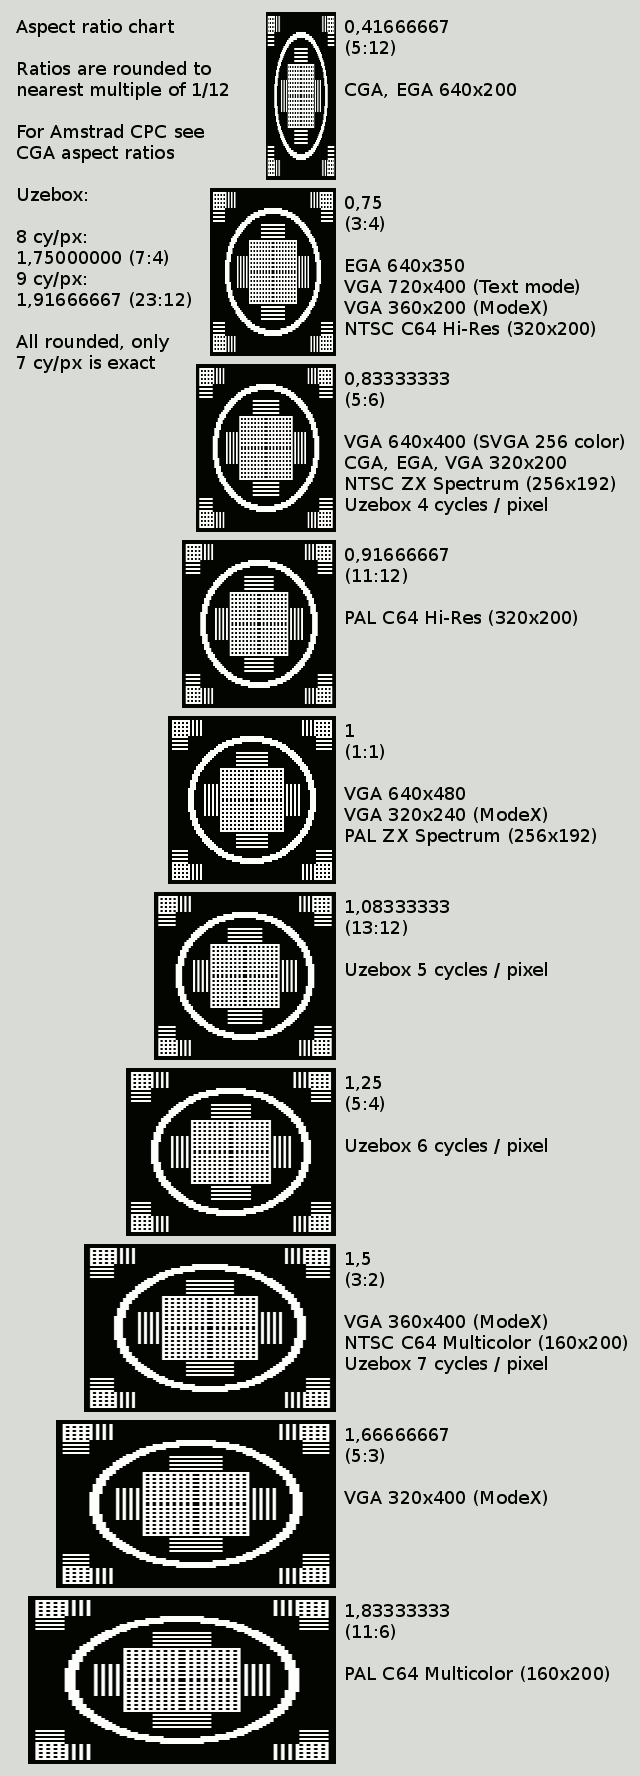
The above chart may help you selecting the proper aspect ratio for editing. Note that they are rounded to the nearest multiple of 1/12. Some interesting systems and modes in particular are the followings:
- 3:4 aspect ratio, all listed modes map almost perfectly. This is a very clean ratio which should be used by dividing horizontal DPI by 1,5 and vertical DPI by 2, or by 2 and 3 respectively.
- For a PAL C64, you may cheat and simply assume 1:1 pixel aspect ratio. It isn't that noticeable unless you also wish to have your artwork show reasonably well on an NTSC C64. That case using 5:6 aspect ratio might be a better choice, slightly distorted on both systems, but not outrageously.
- The PAL ZX Spectrum has an almost perfect 1:1 pixel aspect ratio (pixels are only slightly wider than tall). Uzebox's 5 cycles per pixel mode is actually slightly nearer to it than the chart suggests.
- 3:2 aspect ratio, all listed modes map almost perfectly. This is the cleanest non-square pixel aspect ratio. The 360x400 ModeX has an interesting feature: If only a "letterboxed" 360x360 portion is used (and the VGA registers are set up right), it can map nicely to 720p video, and 360x360 is just a little bit below 128Kb, so using VGA's 256Kb RAM the most efficiently for double buffering. This could be a nice choice for retro style games.
- Not shown is 2:1 aspect ratio, used by 320x480 VGA ModeX. For Uzebox, 9 cycles per pixel is nearer to this than 10 cycles per pixel (even though 5 cycles per pixel is the nearest to 1:1 aspect ratio).
Make a comment
Rules
- Please be polite (Leave all your trolls in their respective caves).
- If #1 fails, don't feed 'em. They bite.
- No links allowed. It won't pass. Neither chains. Use '(dot)' notation.
- Spam reeks.
- Text is (some day will be) formatted with Markdown.
- Your mail address is only visible to me: I understand you also don't like #4.
- The mail address you provide is also used to fetch your Gravatar.
- Danger! High voltage! Right between your "Post Comment" button and ground.
- Still want to comment? Go ahead! :)
Comments
Jubatian
Andrew: Wow, this is cool, was just reading about some VCS programming myself, crazy old system to tame! That game looks great! :)
https://forums.atariage.com/topic/323162-wen-hop-the-search-for-planet-x/page/16/#comment-5257451
Andrew_Davie
Thank you for the clear instructions. Very helpful and worked first time. I use this for editing images I'm using for Atari 2600 programming. I linked to your page and summarised at AtariAge. If you want to find it, search for "Wen Hop" thread, pp. 16, comment #5257295
Jubatian
FRS: Thank you, that's useful to know, I wasn't even aware that PNG had such a feature! I mostly used these techniques to create pixel art for various retro or retro style machines (such as Flight of a Dragon's graphics for Uzebox).
FRS
Thank you for this excellent article! I've been pointing it to a lot of people who want to learn how to draw with non-square pixels.
I think it's important to mention too that, in order to save the Pixel Aspect Ratio metadata on PNG files, the user must select the "Save Resolution" checkbox on the file export dialog. Then the can also click on the "Save Defaults" button to have this ready for the next times.
Jacob
Thanks, this is exactly what I needed. The aspect ratio graphic is handy too.